Thursday, March 15, 2012

Healthy Kid's Lunches

image: gamene (flikr)
I've had a lot of friends ask me lately, "So, what do you feed your kids for lunch?" This seems to be a big stumbling block for families that want to eat healthy. Dinners are simple enough to prepare in a healthy manner; but what about the kids that are used to getting a peanut butter and jelly sandwich, bag of Doritos, and a few Oreos in their lunch? How do you transition to more healthy alternatives?

I started slowly. When I first began my elimination diet, it was just for myself and Caleb. Caleb still can't eat solid foods, so I simply puree our healthy dinner leftovers from the night before and serve those up for his lunch. But for my girls...one is school-age and the other will be in kindergarten in just a few months (sob)...I began by switching to all-natural, no-sugar-added peanut butter. Then, I purchased organic jam. Several months before the elimination diet, I had stopped buying honey and was using agave instead, and thankfully one of my girls was already a big fan of peanut-butter and agave sandwiches. Then, I made a big batch of my own strawberry jam, without pectin and sweetened only with agave. The next step in the transformation of the sandwich was that I stopped buying bread for a while. My kids didn't mind rice cakes, so there was a period of about four weeks where they didn't have bread at all, only rice cakes with peanut butter on them. I filled a tiny jelly jar with peanut butter, and sent my daughter with a little spoon so she could add the peanut butter to the rice cake herself when she got to lunch. This helped prevent a soggy, messy rice cake!

After about a month with no bread, I re-introduced bread by purchasing this gluten-free brand. It is almost impossible to find a gluten-free bread that does not have eggs, soy, or corn in it. This brand checked all the right boxes. After not having bread for a while, the girls thought it was great and I used it for a month or so to make their sandwiches.

Then, this week I tried this sandwich bread recipe. Yum!! It was easy enough to make, and one loaf has lasted about a week, so I'm planning on making this bread for their sandwiches from here on out. (I have yet to find a good gluten-free, organic sliced turkey for sandwiches or wraps; if you know of one, please tell me!)

Okay, enough about sandwiches. This is not our only option for a healthy lunch! As I mentioned before, rice cakes are good with some kind of nut butter or seed butter, and agave or jam. They are also good with hummus or some other kind of bean dip spread on them.

Our other stand-by for lunches is hummus & veggies for dipping. I use this recipe from The Whole Life Nutrition Kitchen. I make it just like her recipe, except instead of 1 teaspoon of cumin, I add 1 tablespoon of cumin. I made it this way the first time as a mistake and loved it so much I do it every time now, on purpose! The great thing about hummus is that it's very filling, and you can get a lot of healthy veggies into your kids when you provide veggies for dipping. My kids' favorite veggies to dip are carrots, broccoli, and red or green bell peppers. But anything goes! I also love dipping celery and fresh, crunchy green beans in hummus.

One healthy alternative is wraps. However, I can't find a store-bought wrap that I like. I may have to break down and make my own home made but I am really dreading that. Just seems like a lot of work! I've tried using lettuce for wraps...I think I never use quite enough so it falls apart too easily. I recently heard about using collard greens as your wrap...that sounds kind of cool...I think I'll try it soon, maybe with some hummus and bell pepper slices inside.

I always provide a side of fresh fruit and try to add a side of fresh veggies to any sandwich or rice cake. Sometimes a handful of dry roasted almonds or dried fruits too. I make sure to keep things fresh by occasionally adding a homemade treat of some kind. Adding home made treats is more of the exception than the rule, but I never want my kids to feel deprived. I just make sure to trade the unhealthy junk food for treats that are packed with as much nutrition as possible. At the very least, when I send them a home made treat, I know it is free of gluten, dairy, eggs, corn, soy and usually refined sugar. It's also organic. These little changes add up and make a difference, I'm convinced of that now.
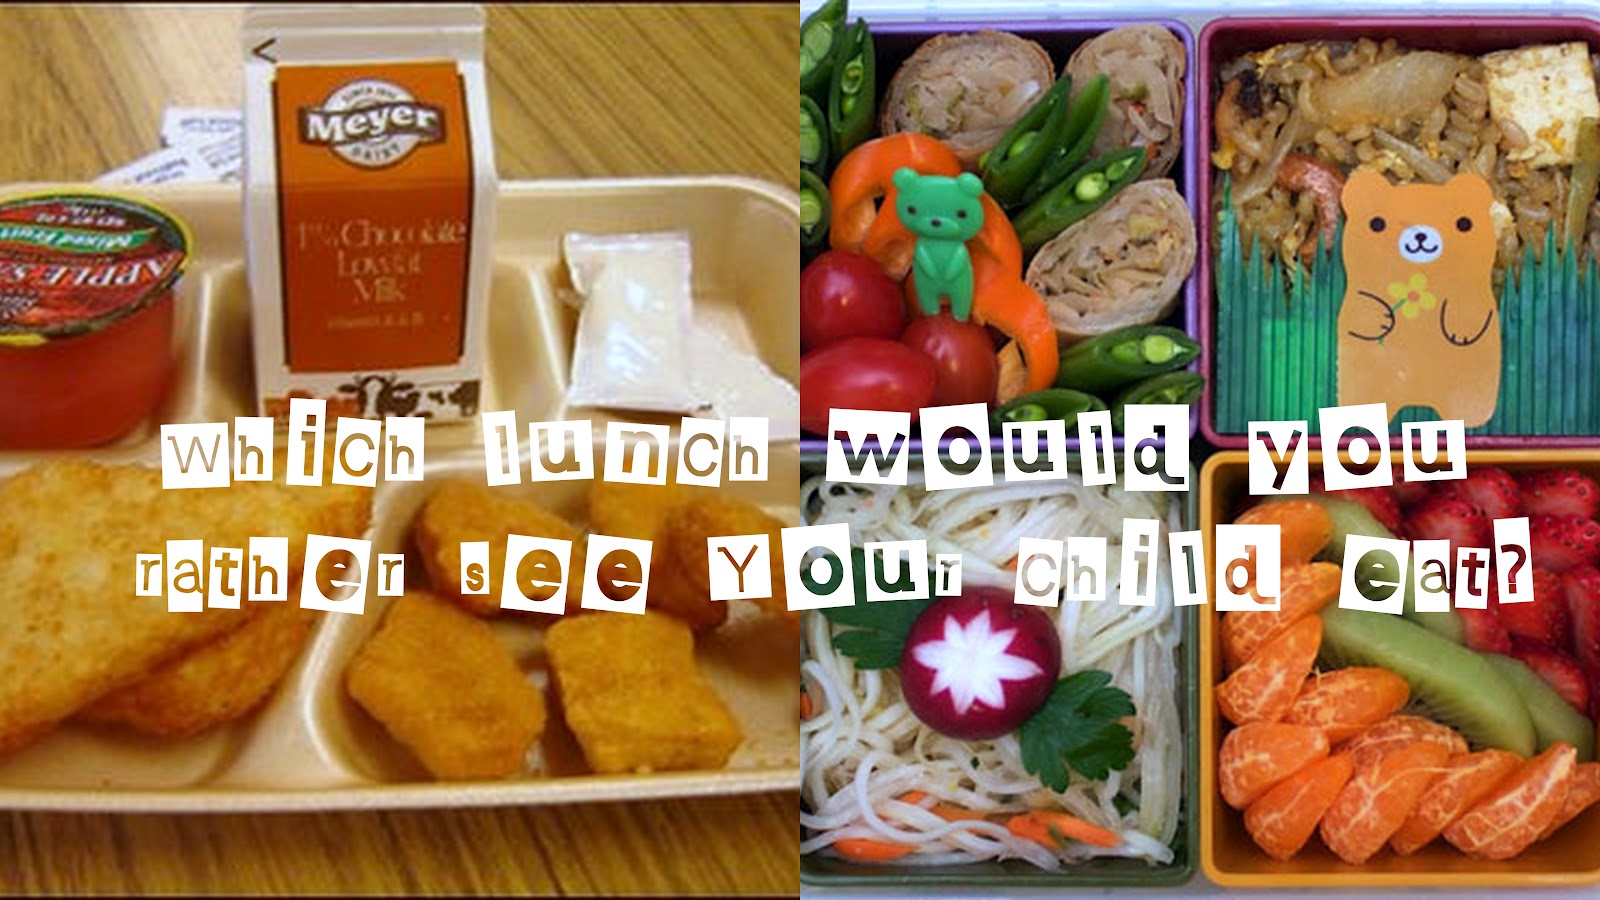
I am still learning and developing in the area of making healthy lunches for my kiddos. They are SO much better than they used to be, but I'd still like to see them have more variety. I'd like to see them enjoy almond butter as much as they do peanut butter. I'd like to see my daughter get comfortable with bringing soup in a thermos, for example. By next school year I'd definitely like to get a few more things in the repertoire. But, my kiddos are still young, and I know that if I keep working on it and don't give up, they'll soon be eating healthier than most adults I know. (In fact, my daughter says that the cafeteria duty teacher looks to see what my daughter has in her lunch every day, so she can copy it for her own children!)

Here are some other helpful resources for healthy lunch tips and ideas:

Back to School Lunches for Healthier Kids
Recipe Round-Up: Ideas for Packing a Healthy School Lunch
Healthy School Lunch Ideas for Kids
Packing a Healthy School Lunch

I had a friend (whose children are now adults) commend me recently for teaching my children young to eat right. She was very honest with me and said that's something that she dropped the ball on when her kids were little, and now as a family they all struggle with being overweight and unhealthy. She said she  would go to McDonald's whenever the kids wanted to. There just weren't any boundaries for food, and now she's got some regrets in that department.

The fact is, we aren't raising little children...we are raising future adults. Let's give them the tools they need now to make wise decisions later! Here's the thing: it might take a little bit of extra time to prepare a lunch that's not based on pre-packaged foods. But I firmly believe that taking the time (and it doesn't have to be a LOT of time!) to pack foods full of fresh, natural goodness is an important part of nurturing our children. Many of us are aware that we need to be nourishing our children emotionally with lots of love, hugs, and quality time, but sometimes we forget that nourishing their little bodies is just as important. We have a chance now to help shape our children's health for the future...let's do it!

Wednesday, March 14, 2012

Purple Mash (a Healthy Mashed Potato Substitute)

Let's face it, cauliflower is not always that exciting. But it's a super food, so I keep trying to figure out ways to incorporate it into our diet. A couple of weeks ago, my daughter and I spotted purple cauliflower at Whole Foods. I told her it would be an "adventure" to cook it...and she was totally into it! Here's how to make purple mash that kids will actually like:

1. Buy PURPLE cauliflower (they have orange, too! and of course white will work)

 2. Chop and steam it

3. Blend and mash it...add salt, pepper, and garlic powder to taste. Add a few tablespoons of the milk of your choice to make it more creamy.

4. Enjoy your healthy PURPLE MASH!!!

Monday, March 12, 2012

My Bread Experiment - gluten-free, wheat-free, dairy-free, egg-free, soy-free, corn-free


I eliminated yeast from my diet last October and have not tried to bring it back...until now. You see, my girls still like to have sandwiches for lunch, and because they are on a very similar diet to my own, I've been buying those bricks that masquerade as loaves of gluten-free bread in the freezer section of the grocery store. (And they cost almost as much as a gold brick.) Well, this weekend we happened to run out of bread and money at the same time, so I decided to finally attempt the recipe I had purchased the ingredients for months ago but had yet to make:  this Everyday Sandwich Bread that is gluten-free, wheat-free, dairy-free, egg-free, corn-free and soy-free. I was literally scared to try it, mainly because it does have yeast in it. I don't have much experience baking with yeast and for some reason that intimidated me to my core. I had to  have one of those out-loud pep talks with myself just to get up the guts to try it...mainly because of my fear of failure! Finally my husband - ever the voice of reason - reminded me that the worst that could happen is I'd have to throw it away and start over. Oh...so you mean...the sky won't fall on me? Okay.

So I made it.

And Oh. My. Word. I mean, seriously. I have not had bread since October. So, you might imagine I was going nuts as I could smell this bread baking in my own house. Then I pull it out of the oven and it. is. perfect.


So, I decided at that moment: "Hmm, today seems like a really good day to re-introduce yeast into my diet and see if my body has an intolerance to it." (After doing an elimination diet, if you choose to try and re-introduce a food into your system, you eat it three days in a row.)

I HIGHLY ENJOYED this delicious bread.

My body, alas, did not.

Oh, the PAIN. I finally (after only two days of eating a little of this bread) had to wave the white flag and surrender. Yeast is not for me. Sigh. Double sigh. Triple sigh. Because this bread is GOOD.

But honestly, there is a part of me that's okay with it. You know why? Bread was a food that I always over-indulged on in the past. Knowing what I do now about the little fact that it was making me so ILL kind of helps with my self-control. I mean, I need to have self-control anyway, but...I have a history of not regulating myself when it comes to portion control. You want a piece of bread? Great! You want three or four pieces? Okay! With butter and cinnamon and sugar on top? Why not! But now, I can officially scratch "yeast" off the list of foods that are okay for me to eat.

So while I wipe away a little tear (figuratively), I also do a little happy dance. Because yeast is a slippery slope that leads to bread, which leads to lots of bread, which leads to being sick and overweight and miserable.

And I don't want to go there again.

P.S. And since baking this bread for my family earned me their coveted "best mother on the planet" title, I will now have to torture myself by making the afore-mentioned bread once a week for my children. Ah, a mother's love. Wish me luck. ;-)

P.P.S. please like Whole & Free on Facebook! :-)

Thursday, March 8, 2012

Rosewater Cardamom Cupcakes

Edible butterflies from Sugar Robot 
We need to have a moment of silence, because this is probably the last recipe in quite some time that I will be posting that contains refined sugar in it. Caleb and I are back on a strict no-sugar regime indefinitely. Actually, perhaps a shout of joy is more appropriate, because when I truly avoid sugar for a long period of time, I lose my food cravings. I lose those highs and lows that come from having sugar in my system. Best of all, I lose the emotional crashes that come along with it...I've learned that I easily feel depressed and anxious when I've been eating sugar.

Wow, with an endorsement like that, no one's going to WANT to try this next recipe!  Yikes.

For those that are still reading...I made these delicious cupcakes for my birthday party last weekend (yes, I threw my own birthday party...eh, it's a long story!) and have had several people ask for the recipe. So here ya go!

It took several tries to get this recipe just right, primarily because both cardamom and rosewater pack a BIG punch. Use a light hand with the rosewater!


Rosewater Cardamom Cupcakes
free of gluten, wheat, yeast, dairy, eggs, corn, soy, nuts


2 cups gluten-free oat flour
¾  cup organic evaporated cane juice (sugar)
¼ cup brown sugar
¼ cup coconut flour
1 tsp. baking soda
½ tsp. fine sea salt
¼ tsp. cardamom
1/3 cup melted coconut oil
1 tsp. apple cider vinegar
2-3 drops rosewater (no more than 1/8 tsp)
1 cup vanilla coconut milk


_______________________________________
Frosting:
½ cup Spectrum shortening
2 cups organic powdered sugar
1 tsp. vanilla
2-3 drops rosewater
2 Tb. Coconut milk (add more if you want lighter frosting, less if you want it thick and dense)


1.       Preheat oven to 350 degrees. Line muffin tins with paper liners. Cute ones only, please! J
2.       Mix oat flour, sugar, coconut flour, baking soda, salt, and cardamom together in one bowl with a whisk.
3.       Mix oil, vinegar, and rosewater together in another bowl.
4.       Add oil mixture and coconut milk to the dry ingredients and blend well.
5.       Pour into lined muffin tins, fill about halfway full. I use an ice cream scoop for this…it is the most amazing tool for cupcake & muffin batter…I don’t know what I did without it!
6.       Bake at 350 for 20 minutes, or until the top springs back to the touch.
7.       Let them cool in the pan for a minute or two, then transfer to a wire rack to cool the rest of the way.
8.       To make the frosting: soften the shortening a bit first if necessary. Cream the shortening in the mixer, than add powdered sugar, vanilla, rosewater, and milk. Here’s where I do some tasting and testing as I go…some days it needs more milk, some days more powdered sugar. **Note: Rosewater is POTENT STUFF. I can’t tell you how many times I made this recipe with too much rosewater. A little goes a long way. When it’s just the right amount, you get a delicate, flowery flavor that is so unique.  


Linking up to gluten-free easily's Gluten Free Support Group

For more recipes and helpful links, like Whole & Free on Facebook!

Monday, March 5, 2012

Baked Oatmeal Casserole (gluten-free, vegan, sugar-free)


So we have oatmeal a LOT at our house. I primarily eat either oatmeal or a smoothie for breakfast every single day. The kids eat a lot of homemade granola (made with - you guessed it - oats) and oatmeal with various fruits added in. It was surprisingly easy to ween them off of brown sugar in their oatmeal, which is how they had always eaten it before. Kids are really pretty adaptable...more than we give them credit for, I think!

But every once in a while, we need an oatmeal dish that seems "special". For instance, I made this ahead of time on Christmas Eve and then baked it on Christmas morning. It was quick, easy, and healthier than the cinnamon-rolls-from-a-can of our past. But still delicious!

This oatmeal casserole is technically sugar-free...it is sweetened with agave. Agave does still raise a person's blood sugar, but it is a slow-release sweetener that only enters that bloodstream a little at a time, therefore making it ideal for diabetics or those who have a low tolerance for sugar. Since pears are quite sweet and raisins have an extremely high sugar content, this usually turns out almost too sweet for me (even though it's only sweetened with agave). For a diabetic, or someone who can't tolerate high sugar levels even in fruit, I would try substituting strawberries, raspberries, or blackberries for the pears...then try substituting dried blueberries or cranberries for the raisins. It would still be equally as delicious, I'm sure!


Old-Fashioned Oatmeal Casserole
gluten free, dairy free, egg free, wheat free, yeast free, nut free, sugar free

3 1/2 cups coconut milk (or milk of choice)
2 tablespoons Spectrum shortening (or butter/margarine substitute)
2 cups gluten-free old-fashioned oats
2-3 small pears or apples, peeled and chopped
2/3 cup raisins (or dried fruit of choice)
2 tablespoons agave
1 teaspoon vanilla extract
1/2 teaspoon cinnamon
1/2 teaspoon salt

Preheat oven to 350 degrees. In a saucepan, brink the coconut milk and shortening to a boil. Slowly stir in the oats. Stir in the pears/apples, raisins, agave, vanilla extract, cinnamon, and salt. Cook mixture, stirring constantly for one minute. Pour the mixture into your dish (I used one a bit smaller than a 9x13). Bake uncovered for fifteen minutes. Serve warm with extra milk on the side.

Saturday, March 3, 2012

Goodwin Granola


 My family LOVES this granola. They cannot get enough of it. It’s SO much cheaper and SO much healthier than even the healthiest of store-bought breakfast cereals. Go ahead – try and find a cereal in the store that your kids will eat that doesn’t have sugar added to it. (And news flash: evaporated cane juice is still sugar…just a little less refined than normal sugar.) Today I tried omitting the chocolate chips (to make it completely sugar-free) and added two tablespoons of vanilla protein powder to make it extra filling...and it was delicious! (If you don't have or use protein powder at your house, not to worry...it's just as fabulous without.)

What I have found is that you get a more crunchy granola when you use chunky peanut butter, and I would imagine the same would go for chunky almond (or other nut) butter. When I use creamy almond butter (which I actually prefer) it has a sweeter taste, but it's not quite as crunchy. You can also add any other dried fruit of choice in place of the raisins if you wish...you might want to wait until the granola is cooked and then add the fruit at the end. Make it how you want it and have fun with it (and try to resist...er...snacking on it!).


Goodwin Granola
Gluten-free, casein-free, egg-free, can be sugar-free and nut-free, yeast-free, vegan

2 cups GF old-fashioned oats
¼ cup flaxseed
¼ cup sunflower seeds
½ cup raisins
¼ cup unsweetened shredded coconut
¼ cup sliced or chopped almonds (optional)
¼ cup Enjoy Life mini chocolate chips (optional)
½ cup almond butter (or other nut/seed butter of choice)
½ cup agave
5 tablespoons coconut oil
1 teaspoon GF vanilla extract
                                                                                                                                                                              
Preheat oven to 300 degrees. Mix all the dry ingredients together in a medium bowl. Heat almond butter, agave, and coconut oil together in a saucepan on low heat, just until melted and combined. Stir in the vanilla and remove from heat. Pour over granola mixture and spread onto a baking sheet lined with parchment paper. Bake for 30 minutes. The granola will get more dry and crispy as it cools. Break it up into smaller chunks and store in an airtight container. I think it will keep up to a couple of weeks, but since it always gets eaten within a couple of days at our house, I wouldn’t know!
                     

Friday, March 2, 2012

Homemade Chicken Stock

So I did something this week that I've wanted to do for years. I'm not sure what finally propelled me to do it...but I made homemade chicken stock for the first time. Kind of embarrassing to admit that,  because I'm sure there are a lot of serious cooks out there who've been doing this for years. I know that's how my grandmother did it. Maybe my mom too? Back in the day, I never cared enough about being in the kitchen to observe it, if she did.

dump it all in the pot...cover it with water

Anyhoo, remember the Balsamic Roasted Chicken I made this week? That was beyond finger-lickin'-good? The next day I got up my courage to make my own chicken stock with the leftover chicken carcass and drippings, using this recipe from Affairs of Living (she's got a fab recipe for Chicken Stock and one for Veggie Stock too, for all you vegans.) 

I basically dumped everything in my biggest stockpot and covered it with water. I boiled it for a couple of minutes to get rid of any pesky bacteria. Than I dumped the whole thing in my crockpot and let it simmer on low for almost 24 hours! With the amount of stock it made, I could have frozen it and used it for several dishes. Instead, with there being a lot of sickness in my house this week, I decided to just make one enormous pot of soup with it. Either way, judging from the amount of stock it produced, I figure it saved me at least $15. This is not the cheapest of lifestyles, so every bit helps, right?  

I then used it to make a really lovely, healing sort of soup with kale and quinoa, which we were able to eat on for two days. I forgot to take any pictures of it before it got eaten up! Rookie. Trust me. It's good. (I'll have to write the recipe down later.) The homemade stock had such a wholesome flavor. And literally, just as I was typing this post, I realized that it didn't hurt my insides the way that store-bought stocks usually do. I buy the gluten-free, organic stocks...but still...something was different about homemade. Verrrry interesting....

I'm considering making a whole roasted chicken once a week. Caleb could use the additional calories from the dark meat...my family would think they had died and gone to heaven...and I could start freezing my own stock I make from the leftovers. I think I'll try it!

(...And this is yet another one of those moments where I think, who is this person? When my husband and I met, I couldn't even cook a take n' bake pizza without burning it! My cooking skills were the laughing stock of my family! And now...I'm cooking things entirely from scratch, often making up the recipe myself, and they are GOOD. Seriously. If I was able to experience a transformation like this, anybody can!)